|
In a search for more firepower, the T-40 was actually preceded by the T-30, which was very
similar, with the same hull, but with a turret that housed a 20mm gun, like a T-60.
Unfortunately, the turret with the larger gun, was much heavier, and therefore caused some
difficulties in the water. It was then decided to adopt the lighter design of the T-40.
Production started in 1940 with fewer than 300 units being manufactured, but by 1942 the tank
was already outdated, so an up armored version was produced. However, the increased weight of
this vehicle caused it to loose its amphibious capabilities.
|
|
![[Index]](../../../Redstar3a.jpg)

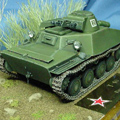
![[The little green dude!]](T-40-90a.jpg)
![[Love those MV lenses and Friulmodel tracks!]](T-40-92a.jpg)
![[The molding and detail is rather simplistic, and the kit out of the box has a toy-like appearance.]](T-40-01a.jpg)
![[The molded in radiator grill was removed with a sharp #11 blade leaving the support bars.]](T-40-03b.jpg)
![[The upper hull, out of the box (left) and after modifications (right).]](T-40-04a.jpg)
![[The fender detail, before and after.]](T-40-06b.jpg)
![[On the hull sides, there is a plate seam that was missing. The seam was scribed in the appropriate place and Grandt Line rivets were placed in pairs on both sides.]](T-40-08b.jpg)
![[The idler mounts with and without Grandt Line bolts. Note the pins to mount the idler wheels.]](T-40-07b.jpg)
![[The tow hooks were detailed with more Grandt Line bolts and short lengths of fine chain.]](T-40-20b.jpg)
![[The splash deflector and the main gun guard were too thick, and were replaced with sheet styrene parts, and both gun barrels, were drilled out. Also note the front hook with bolts and chain, and the hefty seam that had to be filled.]](T-40-19a.jpg)
![[The view ports on the turret and the sides of the super-structure were replaced with parts made from an empty Eduard fret. The pry bar was replaced with a piece made from metal rod, and the shovel blade was thinned and the molded on mounting bracket was removed, and the handle was cut off and also replaced with metal rod.]](T-40-18a.jpg)
![[Flat Black Primer]](T-40-25b.jpg)
![[Color]](T-40-27b.jpg)
![[Gloss coat, decals, and an acrylic wash.]](T-40-29b.jpg)
![[Testors lacquer dull coat.]](T-40-32b.jpg)
![[Dry Brush and weathering]](T-40-36b.jpg)
![[The finished product!]](T-40-91b.jpg)
![[An overhead view.]](T-40-93a.jpg)