|
Weathering: I typically like to use oil
colors as a wash, and will thin them down very far, and then add more color as necessary.
This normally gives fairly consistent results, and sometimes on the smaller scale it is very
easy to go overboard on weathering, so I try and keep it on the lighter side. I have
found to simulate streaking or discolored paint on a vehicle, I will take just a dab of several
colors, green, black, rust, yellow, blue, brown etc, and put those dabs in one spot. Then
with a larger brush, you just pull the color down and it looks like a streak. This is a
very convincing way to add some streaks without over doing it. Several pastel chalk colors
were then used to give the slightly dusty look to the hull and wheels without going overboard.
After that, a silver pencil was used on some of the high spots to make it look like bare
metal and that was about it. |
|
![[I typically like to use oil colors as a wash.]](ID-Pan-076b.jpg)
![[a silver pencil was used on some of the high spots to make it look like bare metal.]](ID-Pan-075b.jpg)
|

![[The Panther was a very successful design and typically considered one of the best tanks of the war.]](ID-Pan-066X_01.jpg)
![[The Panther was a very successful design and typically considered one of the best tanks of the war.]](ID-Pan-066X_02.jpg)
![[The Panther was a very successful design and typically considered one of the best tanks of the war.]](ID-Pan-066X_03.jpg)
![[The Panther was a very successful design and typically considered one of the best tanks of the war.]](ID-Pan-066X_04.jpg)
![[The Panther was a very successful design and typically considered one of the best tanks of the war.]](ID-Pan-066X_05.jpg)
![[The Panther was a very successful design and typically considered one of the best tanks of the war.]](ID-Pan-066X_06.jpg)
![[The Panther was a very successful design and typically considered one of the best tanks of the war.]](ID-Pan-066X_07.jpg)
![[The Panther was a very successful design and typically considered one of the best tanks of the war.]](ID-Pan-066X_08.jpg)
![[The Panther was a very successful design and typically considered one of the best tanks of the war.]](ID-Pan-066X_09.jpg)
![[The Panther was a very successful design and typically considered one of the best tanks of the war.]](ID-Pan-066X_10.jpg)
![[The Maybach V12 engine could power it to about 30mph on road.]](ID-Pan-072b.jpg)
![[The suspension used inter-leaved bogies sprung on torsion bars.]](ID-Pan-078b.jpg)
![[The Turret was considered cramped, but sitting behind that long barreled 75mm gun had to make it easier.]](ID-Pan-070b.jpg)
![[The Panther was equipped with two MG 34 machine guns.]](ID-Pan-077b.jpg)
![[From the front,the armor protection was excellent, ]](ID-Pan-065a1.jpg)
![[This is the Panther G Late Version from DML.]](ID-Pan-059X_01.jpg)
![[This is the Panther G Late Version from DML.]](ID-Pan-059X_02.jpg)
![[This is the Panther G Late Version from DML.]](ID-Pan-059X_03.jpg)
![[This is the Panther G Late Version from DML.]](ID-Pan-059X_04.jpg)
![[This is the Panther G Late Version from DML.]](ID-Pan-059X_05.jpg)
![[This is the Panther G Late Version from DML.]](ID-Pan-059X_06.jpg)
![[This is the Panther G Late Version from DML.]](ID-Pan-059X_07.jpg)
![[This is the Panther G Late Version from DML.]](ID-Pan-059X_08.jpg)
![[This is the Panther G Late Version from DML.]](ID-Pan-059X_09.jpg)
![[This is the Panther G Late Version from DML.]](ID-Pan-059X_10.jpg)
![[These 1/72 DML kits are nice little kits.]](ID-Pan-073a1.jpg)
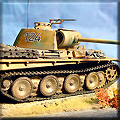
![[Vallejo colors were used to give it the distinctive tri-camouflage paint scheme.]](ID-Pan-062a.jpg)
![[Overall the kit was a nice simple build with no extras added.]](ID-Pan-060a.jpg)
![[I would recommend one of these small DML kits to anyone interested in 1/72 scale tanks.]](ID-Pan-057a.jpg)
