[Matchbox issued the Privateer kit in the 80's]


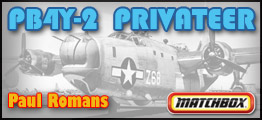
Matchbox is well known to many modelers as a company that produced a wide variety of kits in the 1970's and 80's, all designed to appeal to the low-cost end of the market.   Their kits were simple and usually came in 2 or 3 different colors of plastic so that once built by a novice modeler, they'd at least appear to be in something like the correct color scheme without actually being painted.   Detail was often weak (or too coarse; beware the mad trencher!), but prices were low and variety was excellent, with a number of subjects having never been kitted by any other company before or since.   The Privateer is one of these, and when Matchbox got out of the plastic kit business in the 80's, their molds were acquired by Revell, who has re-released many of them over the last few years.


[This is the Revell reissue of the Privateer.]


The Revell re-pop has new decals and is all one-color plastic, but it's the same Matchbox mold.   Construction begins by separating all the major pieces from the sprues.   Everything fits well enough, but the kit is engineered so that it can be built as one of three different versions, one of which does not have the distinctive side gun blisters.   There's a large square hole in the fuselage that takes either a flat panel or the gun installation, and this requires some filler and sanding to get rid of the large seam.   There are also two different noses, with or without the turret.   Numerous windows along the sides are also available depending on which version you're building, and you have to cut away the thin layer of plastic molded over the openings you want.   Be careful not to get the wrong ones!


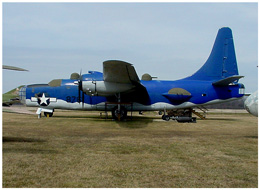
The Consolidated B-24 Liberator was produced in larger numbers than any other bomber in history, and spawned a number of different variants.   Perhaps the most extreme adaptation of the original design was the PB4Y series, a version optimized for Maritime patrol duties.   During WWII the US Navy found that long range patrol planes, ranging far out over the ocean, were very useful in spotting and attacking enemy ships and submarines, and since the B-24's high efficiency Davis wing gave it longer range than any other American aircraft at the time, it was a natural choice for the job.   The PB4Y-1 was a mildly modified B-24, but the -2 was a radical departure from the original with a completely different single-fin tail, a lengthened fuselage, all-new defensive armament, and re-designed engine nacelles.   As the intended mission for the new bomber was low altitude patrol, the B-24's superchargers were deleted along with the ventral gun turret.


Entering service in late 1944, it was first deployed in January of 45, patrolling the seas around the Philippines and Marianas islands, but there wasn't much left of the Japanese navy for it to attack.   When the war ended it was pressed into service as a typhoon chaser, but when the Cold War began in the late 40's, the Privateer found new life as an early spy plane.   Equipped with cameras and ELINT devices, it flew clandestine missions around and probably over the USSR and Communist China.   739 Privateers were built, the Navy retiring the last of them in 1954.   The Coast Guard used them until 1958, and most ended their careers as target drones.   Some were sold as surplus and adapted as cargo planes and fire-fighting water bombers, but after one of the few left crashed and killed its 2-man crew in 2002, all others were grounded due to structural fatigue.   The local Yankee Air Museum actually has a PB4Y-2 in their static display area, which they acquired in 1987.   It was being used as a fire bomber and was donated to the museum after it was damaged when sliding off a runway.


[A Squadron replacement vac-form cockpit canopy set was used. ] [The vac-form replacement for the rear turret was the wrong version so the poor fitting kit part was made to work. ]


This beast has a lot of clear parts, and the kit supplied ones are typically thick and unrealistic.   Squadron makes some nice vac-form replacements for most of the pieces, so an order was sent off for those, and upon arrival these were cut away and test fitted.

The good news: you can see through the clear parts now.
The bad news: you can see through the clear parts now.

Its a big project just to upgrade the previously invisible interior detail, so I went to work on the cockpit, adding seat belts and painting up the instruments.   Everything's painted interior green.   All the turrets had some imagineered bits added to improve their looks, but the vac-form replacement for the rear was wrong for this version of the plane and was unusable.   I dipped the kit piece in Future, added some more bits and pieces for interior detail and glued the clear part on.   The fit here is lousy, and I had to add thin plastic shims to fill in all the gaps around the complicated shape.   It still doesn't look very good, but it's livable.


[I had to add a lot of extra parts to simulate the complicated gun blister system.] [All the turrets had some imagineered bits added to improve their looks.]


On to the side blisters.   Internet photos show the turrets here were actually drum-like devices that rotated up or down under power, the seat for the gunner moving with it.   The guns traversed left-right in a motorized track.   I thought the guns were just hand-held like in the B-24, but now I had to add a lot of extra parts to simulate this complicated system.   I curled some sheet plastic into little cones and cut away the short halves I needed for the backside of the turret.   Gun breeches were built up, and seats were made along with supports for the gun sights.   The replacement clear parts were trimmed to fit and glued in place with white craft glue to help fill in the gaps.   Onward.


[The biggest problem with the entire kit was the dratted nose turret.]


The biggest problem with the entire kit was the dratted nose turret.   For one thing, it's too large and not to scale, but making a new one that was 1/16 of an inch smaller was more trouble that I wanted to get into.   I built up an entire turret interior and spent waaay too many hours filling in all the gaps around the turret-frame joint, and the gap where the turret meets the fuselage.   Shims, putty, sanding, filing, cursing, pleading, all were used to get the thing looking decent.   I also had to add several interior bulkheads to blank off parts of the nose, otherwise you'd be able to see right through the bombardier's station or the nose wheel well, or the cockpit or the upper turrets or the... you get the idea.


[It almost took a cast iron frying pan to get it to sit on its nose.]


Ok, we add lead shot to the nose to hold the thing down on its gear and test fit everything.   Then we add still more weight and test again.   Then we add a friggin' cast iron frying pan to the nose to hold it down.   I was packing in lead fishing-line sinkers cut up to fit the available space until I was afraid I'd snap the gear off, but it finally sat on its nose.   Just don't breathe on the tail.   At this stage the fuselage may be closed up, thank God.   The cockpit canopy was glued on and masked off with Scotch Magic tape, (frosted) and will be painted along with the rest of the model.


[Shims, putty, sanding, filing, cursing, pleading, were all used to fill the gap where the nose turret meets the fuselage.]


Wings and tail went together without much trouble, needing only some sanding to the rear edges to help thin them down, and a re-scribe job done to the control surfaces to better define those.   The engines were standard, and I just re-scribed the cowl flaps.   Wings and tail are glued on, as are the electronics blisters along the underside of the nose.   Don't mix them up like I did.   Off to the paint shop!


[I wanted the three-tone dark blue - medium blue - white underside scheme of the late 40's US Navy. ]


I wanted the three-tone dark blue - medium blue - white underside scheme of the late 40's US Navy, so the white was shot first.   I used Polly-Scale acrylics for most painting; no smell, dries fast, and cleans up easy.   Next was the medium blue along the sides, and the soft edge was made using blue-tack craft putty rolled out in a thin rope and applied along the paint line.   All four engine nacelles needed this treatment, and spraying the inner ides was tricky, needing a couple sessions of touch-up paint to get it all right.   The topside dark blue went on last, and once dry everything was covered with Future to provide a gloss base for the decals.


[The decals in the Revell reissue are extensive, and cover three versions.]


The decals are extensive, and cover the three versions mentioned before, but I was sticking with the US Navy version.   Everything went on well and lay down with judicious applications of mirco-set, and once these were dry overnight the model was overcoated with flat finish.   I typically weather and dirty-up these things before adding final details, and use mostly pastels for this.   A dark wash was used to accentuate panel lines, cowl flaps, control surfaces, etc.   Brown, gray and black pastels simulated exhaust, oil leaks, and general wear on the finish.   Good reference photos are useful here.


[The landing gear were actually rather well done.] [The kit-supplied props were poor and were replaced from an old Revell B-24D kit.]


I peeled off the masking from the clear parts, added the numerous detail antennas, landing gear (which was actually rather well done), snapped on the turrets and went to the props.   Ugh.   The kit-supplied props are considerably, uh, wrong.   The shape of the blades is way off.   Either they'd need quite a bit of sanding or replacement.   I sorted through the spares box without much hope, but then remembered an old Revell B-24D kit on the shelf, the "Warbird" one from the 60's.   Checking the props from this venerable antique revealed usable and correctly shaped units that fit right into the Privateer.   Once painted and weathered, these looked quite acceptable.


[The soft paint edge was made using blue-tack craft putty rolled out in a thin rope and applied along the paint line.]


Conclusion:   Done!   In the end, an impressive addition to my 4-engine bomber collection, (all two of them), and overall an enjoyable build.   The turret issues aren't really that bad, just finicky because they're so small.   Adding the Squadron vac-form canopies were a big improvement, and I have a rare addition to my collection, which is still the only mainstream kit available for a PB4Y-2.   Modeling can be fun!


[Adding the Squadron vac-form canopies were a big improvement to the old Matchbox kit.]


[Back]


Copyright © 2017 - All rights reserved.