IE Users - Click to Bookmark


[]


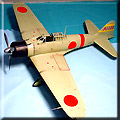
I was glad to see a modern release of the Zero in 1/24th scale, as it's always been one of my favorite aircraft.   Trumpeter has been taking the big-scale world by storm in the last few years, so when this kit came out, I knew I'd have to build one.   A fellow IPMS member had one he wanted to sell, so all the pieces fell into place.

For starters, there's a lot of plastic here.   Instructions are in pictograph format, with little text, and all color references are to the Gunze range.   Photo-etch, soft vinyl, decals, and clear parts all get their own bags.   I started unpacking things, and went to work.


[]


Modern aviation historians give the Zero somewhat short shrift, usually saying that it was a good plane in it's day, but discounting it's overall impact on the Pacific war.   This should be re-examined in light of exactly what the Zero actually did accomplish, both for the Japanese and against its enemies.     More...


[]


The pressings are very well done, with the recessed panel lines, flush rivets and screws all correctly reproduced.   The scribing has a nice scale appearance.   Once I hauled out my reference material however, I started seeing some problems.   The fuselage is incorrect in profile, and the engine cowling has a number of inaccuracies.   It's made up of 5 separate parts, and looks great when put together, but it's still wrong.   Here's why:

1:   The top profile needs to slope upwards to the rear.   It's too flat.
2:   The rounded leading edge is too blunt.
3:   The chin scoop should not protrude beyond the front of the cowl.
4:   The scoop is also too flat in profile, and needs a more rounded
      "belly".
5:   The scoop needs a more rounded "smile" shape for its intake, not       the rectangular opening it comes with.
6:   The scoop and the lower rear of the cowling do not cover the
      bottom of the engine, as they should.


[]


Now, I don't consider myself a rivet-counter, and I understand that the cowling is the hardest part of a kit to reproduce accurately, due to its many compound curves, but I was hoping for a little more accuracy than this.   The problems were solved as follows:

1:   The cowling was cut almost in half from back to front on both sides.   Long thin wedges of styrene card were inserted to open up the rear of the cowling to a more oval shape viewed from the rear.   These were glued in, very lightly sanded smooth, and matching rivet detail was added with a pin drill.   When painted, they are almost invisible.
2:   I couldn't figure out any way to modify the overly blunt front curve without major surgery.   Decided to live with it.
3 - 6:   The chin scoop was sanded flush with the front of the cowling, and small bits of styrene card were added to produce the correct intake shape.   Thick card was then glued to the belly and faired in with putty.   When dry, it was sanded to shape.   More styrene was also added to extend the scoop to the rear and cover the engine supercharger intake.


[] []


Whew, tired already.   The engine was built up, and looks good right out of the box.   I added wiring detail, but not much else.   I also drilled out the exhausts.   Some minor inaccuracies exist, but it's pretty close.


[] []


Now for the cockpit.   It's very complete, and looks great when done, however, there are several features that are found in an A6M5 Zero, not the earlier A6M2.   The differences are minor, so again, I lived with it.   The seat needed its sides built up with more sheet to be accurate.   Eduard makes a nice 1/24th-scale photo-etch set for Japanese seat belts.   They're even pre-painted, and look good when installed.   The twin machine guns are well done, but missing the ammo feed and shell dump chutes, so I made some from sheet stock and installed them.   I added a couple of missing control levers and some hydraulic piping, but that was about it.

A note on color:   Mitsubishi-built planes usually had the metallic-blue interior color, but the more numerous Nakajma-built Zero's had green cockpits.   Your choice.   Once painted, the assembly was given a flat black wash to bring out the detail.


[]


The Zero has prominent slots on the sides for engine compartment ventilation.   These are well done, but again, wrong.   The plastic here is nearly 1/8th inch thick, and the slots should have very thin front edges, and the rear edges should be sloped or beveled inwards.   More card and sanding needed here.


[]


The engine supercharger was well done, but completely hidden when the fuselage is assembled.   I removed the left access panel with a razor-saw, and cleaned up this opening to show the rear of the engine.   I also added some more wiring and plumbing here for detail.


[]


I glued in the engine assembly, the completed cockpit, the tail wheel, and put together the rudder with its (in)famous photo-etch hinges, then mated up the fuselage halves.   These fit well when empty, but all the stuff inside was now creating fit problems.   It took a lot of filing, sanding, cursing and clamping to get everything fitting right.   The tail-wheel retracts just like the real thing, but it doesn't lock in the down position.   I had to glue it in place.


[] []


Next, the wing.   Ailerons, flaps and folding wingtips are all designed to work with photoetch hinges, but they don't work very well.   Everything just flops around.   The wingtips hang loose when assembled, and I spent a lot of time making them fit and fold right.   The flaps have nothing holding them up, so they just droop all the way down.   I added styrene shims to increase the tension on the hinges so they'd stay in place.   The ailerons...   (groan).   You glue them together with the hinge brackets sticking out, glue these to the lower wing with CA glue, and then try to glue on the upper wing.   Nothing fits together right, and there's no way to get glue to the rear edge of the wing without gluing the "moveable" aileron in place.   I used a hypodermic needle to get some liquid glue in there, but it was a pain.   In retrospect, I'd just glue everything in place and say to heck with it.


[]


Mating the wing up to the fuselage is another surprise.   Upper joints are good, but the lower rear joint is so badly engineered I thought there was a part missing.   Again, nothing lines up.   It took lots of shims to locate the wing properly, and lots more shims to fill in the large gaps.   I smoothed out the area with putty, sanded it, and re-scribed the lost detail.   Very bad design here.


[]


Time to start finishing this thing up.   The tail planes went on without trouble, and the canopy's three pieces all fit well.   These were masked and glued in place with white glue so I could paint them along with the fuselage.


[]


PAINTING & DECALS:  Now for the big question: what color to paint it?   To make a very long story short, the best evidence available today shows early Zero's were not painted neutral gray, but an impossible -to- reproduce shade of gray-green-tan.   (j-aircraft.com is an excellent website for info on this subject.)   Also, the best info I can find is that NOBODY makes a good reproduction of this shade, and there is no FS number to match it.   Aeromaster used to make the closest match, but no longer.


[]


After bothering everyone I could for opinions, I went with Tamiya XF-14, "J.A. Gray", first wiping the model down with Tamiya acrylic thinner to remove dirt and fingerprints.   I don't usually use acrylics, (I'm old -school, I'd probably still buy Pactra if I could), but this product performed well.   The color changes appearance depending on the light conditions, just like the real one.   The finish is very flat, so a good coat of Tamiya gloss was sprayed to prep the surface for decals.   The engine cowling was painted black with a little blue added.   Cowlings in service weathered quickly and took on a blue-black hue.


[]


Decals went on ok but gripped real fast.   There was very little time to position them, so use lots of Micro-set to float them around.   Once dry, they still needed a good dose of Solva-set to get them down into all the surface detail.   When everything had dried for a couple of days, I sprayed flat finish lightly over everything to tone down the gloss and make the finish more uniform.   Real Zeros reportedly had a high-gloss finish when new, but the model looked like a cheap toy that way, so I went with a nice even semi-gloss overall, including the cowling and canopy frames.   Once dry, the canopy masks were removed.   There was some overspray inside, but the Tamiya acrylic thinner cleaned this up quickly.


[]


FINAL DETAILS:  Weathering was kept to a minimum.   The markings are for a Pearl Harbor attacker, and those planes saw little service prior to that mission.   I used dark gray and black pastels to add exhaust stains to the engine and guns.   Burnt umber acrylic paint was thinned and applied around the engine and access panels to simulate oil streaks.   Gun access panels were masked off and brown pastel brushed lightly around the outside edges to simulate dirt and grease.   The entire rear half of the model looked very plain, so I highlighted some panels with a gray pastel to break up the monotony.   Control surfaces were fabric covered, so these were masked and painted a lighter shade of the finish with a flat overcoat.


[] []


The landing gear:   Trumpeter designed these with built-in springs and oleo pivots, so they'd work like the real thing.   Again, this proved tricky to get right, and more trouble than it was worth.   I did it, but wouldn't do it again.   I added reamed-out aluminum tubing to simulate the wing cannon guns, some more details to the cockpit, and an antenna wire made from stretched sprue.   Zero's had several pop-out hand and foot holds along the left side of the fuselage.   The locations are indicated on the model, so I fabricated the pegs and steps, and glued them all on.


CONCLUSIONS:


PROS:   Excellent surface detail, a nearly complete fuselage interior, very nice clear parts, overall dimensions correct, BIG scale!

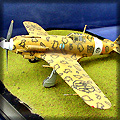
CONS:   Some outline inaccuracies, troublesome fit of the fuselage halves with everything inside, and awful fit of the lower-rear wing joint.   Also working features that don't work very well.

[]


I loved building a big-scale Zero, and this really is a welcome addition to my collection.   If I were to build another, I'd forego the gadgets and the hinges and just glue everything together.   This would cut build-time in half.   I applaud Trumpeter for bringing out this kit, and overall the detail is very good, but I must say that the engineering of the kit leaves something to be desired.   Once done though, it looks like the real thing.


[Back]