For starters the fuselage features the oversize rivets common to kits of
yore. Thick clear parts, minimal cockpit detail, a clunky engine and cowling, and
a general heaviness to most of the parts will all need some attention. There are
shape issues with the float and engine cowling too, but I'll try to correct some of
these. Starting with the 2-seat cockpit, I added some generic do-dads and
seatbelts, but the heavily framed canopy and upper wing won't let you see much anyway,
so I kept it simple. I cut away the tail control surfaces and repositioned them
for a better look. The two body halves were joined, the seams cleaned up and the
rivets sanded down to a more scale appearance.
|
|
 |
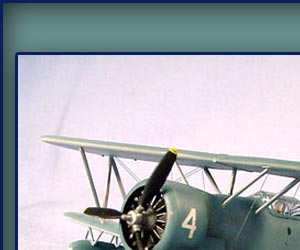
The engine is actually well molded, but the thick cowling needs work.
In most radial engines, you can see daylight thru the cylinders out the back, so I cut away the
heavy plastic between the cylinders and thinned down the trailing edge of the cowl. The
engine was painted gunmetal, washed, dry-brushed and installed, and two small pieces of 1/16"
tubing were added for the exhaust stubs. Another problem is the large oil cooler intake
below the engine, as its louvers are poorly molded. The hole was cut open, and small slats
were glued in at an angle. It's not perfect, but it does look better.
|
|
|
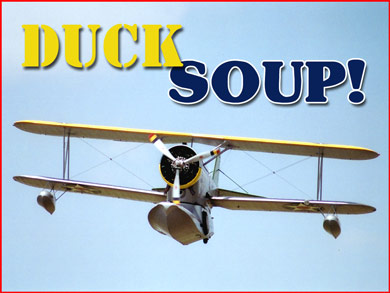
| Back in the 1920's, when most "airports" were
still just grass fields, amphibious aircraft were developed that could fly from both land and sea
bases. While this greatly increased their operational usage, they were usually a design
compromise, being burdened with extra weight and equipment, and possessing relatively poor
performance. Loening Aeronautical built several good amphibious planes, one of which the
Navy expressed interest in, but Loening's factories were purchased by Curtiss-Wright in 1929.
When one of Loening's engineers, Leroy Grumman, went out to form his own company, he was eventually
picked by the Navy to produce the leftover Loening amphibian. Initially called the XO2L-1, it
was first flown on April 25th, 1933 as the XJF-1 Duck.
|
 |
|
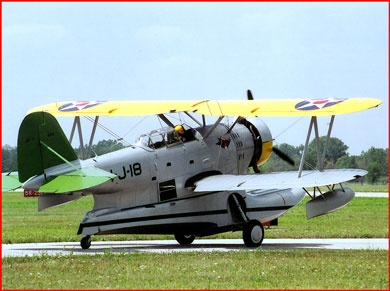
The Duck was a 2-seat biplane with an enclosed cockpit, cowled engine, variable-pitch prop, and a
metal fuselage, all advanced features back then. The hallmark of the design was its single
centerline float that was faired into the fuselage, equipped with landing gear that could retract
flush into the sides of the float. Small outrigger floats were installed under the outer
wingtips, and the enclosed space between the fuselage and float was used for extra cargo or crew.
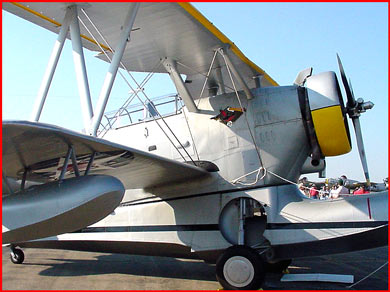
During WWII, the Duck performed many tasks it was never designed for, usually without much
recognition. It was used as a transport, photo recon, bomber, scout-plane, target tug,
smoke layer, ambulance, air-sea rescue, anything that was needed at the time, usually because there
was nothing else available.
|
 |
|
A remarkably rugged plane, it was used by the Navy, Marines, Coast Guard and Air Force (as the AO-12),
and flew from carrier decks, primitive dirt strips, far-flung island lagoons, concrete runways, choppy
seas, and was even stressed for neck-snapping launches from catapults aboard battleships. Though
only 632 were built, they were used all over the world, soldering on well into the 1950's. An
unlovely, awkward plane, it worked much better than it looked, providing sterling service and saving
many lives.
|
|
![[Kit Index]](../../../Old-US-1.jpg)

![[I chose an early war scheme of navy blue-gray over the light gray under sides, and the red-centered insignia and tail stripes used up until May of '42.]](PR-Duck-035a.jpg)
![[I had to fabricate new outer N-struts from plastic strip because the kit parts are far too short.]](PR-Duck-039a1.jpg)
![[The kit decals were in poor shape, so I used some MicroScale replacements from the spares box.]](PR-Duck-033a.jpg)
![[Weathering was done with a dark wash to accentuated panel lines and oil streaks, then pastels for exhaust stains. ]](PR-Duck-047a.jpg)
![[In conclusion, this is a nice little kit, with good fit except for the too-short N-Struts.]](PR-Duck-031a.jpg)

![[I vac-u-formed a new canopy using the kit part as a master, but with the thick frames and upper wing you see much in the cockpit, so I kept it simple. ]](PR-Duck-044c.jpg)